Prerequisites:
AWS Free Tier Account.
Ensure that your VPCs do not have overlapping IPv4 CIDR blocks.
SCENARIO
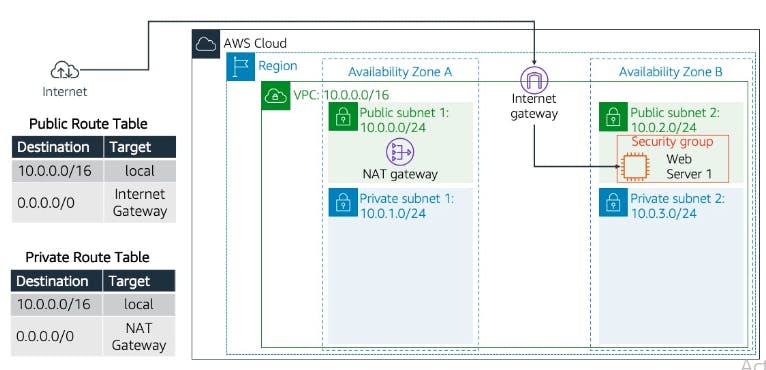
In this Project, you use Amazon Virtual Private Cloud (VPC) to create your own VPC and add additional components to produce a customized network for a Fortune 100 customer. You also create security groups for your EC2 instance. You then configure and customize an EC2 instance to run a web server and launch it into the VPC that looks like the following customer diagram:

Task 1: Create your VPC
On the AWS Management Console, in the Search bar, enter and choose VPC to go to the VPC Dashboard.
Choose Create VPC and configure the following options:
Resources to create: Choose VPC only
Name tag : MyVPC
IPv4 CIDR: Enter 10.0.0.0/16
Tenancy: Choose Default.
Click on Create VPC.
Task 2: Create Subnets
Go to Subnets and Create Four subnet.
Select VPC ID: MyVPC
Subnet Name: Public-sub-1
Availability Zone: ap-south-1a
IPv4 VPC CIDR block: Keep it default as VPC CIDR
IPv4 subnet CIDR block: 10.0.0.0/24
Click on Add New Subnet and create remaining three subnets under MyVPC with following details
Subnet Name: Private-sub-1
Availability Zone: ap-south-1a
IPv4 VPC CIDR block: Keep it default as VPC CIDR
IPv4 subnet CIDR block: 10.0.1.0/24
Subnet Name: Public-sub-2
Availability Zone: ap-south-1b
IPv4 VPC CIDR block: Keep it default as VPC CIDR
IPv4 subnet CIDR block: 10.0.2.0/24
Subnet Name: Private-sub-2
Availability Zone: ap-south-1b
IPv4 VPC CIDR block: Keep it default as VPC CIDR
IPv4 subnet CIDR block: 10.0.3.0/24
Task 3: Create Internet Gateway
Go to Internet Gateway
Click on Create internet gateway.
Name Tag: IGW
Click on Create internet gateway.
Task 4: Create NAT gateway
Go to NAT gateway
Click on Create NAT gateway
Name: myNATGW
Subnet: select Public-sub-1
Connectivity type: public
Click on Allocate Elastic IP
select Create NAT gateway
Task 5: Create Route Table
Go to Route Table to create two route for Public and Private subnets.
Click on create Route Table
Name: Public-RT
VPC: Select MyVPC
Click on Create route table
Click on create Route Table
Name: Private-RT
VPC: Select MyVPC
Click on Create route table
Task 6: Edit Route table
open Public-RT
Select Routes and Edit routes
click on Add route
Destination: 0.0.0.0/0 (all address)
Target: Internet gateway from drop down select IGW-ID
save changes
open Private-RT
Select Routes and Edit routes
click on Add route
Destination: 0.0.0.0/0 (all address)
Target: NAT gateway from drop down select nat-ID
save changes
Task 7: Edit Subnet Association
Select Public-RT
open Subnet association
click on Edit subnet associations
Tick Public subnet from Available subnets List
save association
Select Private-RT
open Subnet association
click on Edit subnet associations
Tick Private subnet from Available subnets List
save association
Now go to VPC and select MyVPC verify configuration from Resource map.
Task 8: Create Security group
Go to Security group
Click on Create security group
Security group name: mySG
Description: allow http access
VPC: select MyVPC
Inbound rule : Add rule
Type: ssh & Http
Source: Anywhere-IPv4
Outbound rule : default
click on create security group
Task 9: Launch webserver
Go to EC2 dashboard and click on Launch instance
Name: webserver
AMI: Amazon Linux 2023
Architecture: 64-bit
Instance type: t2.micro (Free tier eligible)
Keypair: Select .pem file (or create newkeypair)
Network setting: edit
VPC: select MyVPC
Subnet: Public-sub-2
Auto-assign public IP: Enable
Firewall (security groups): Select existing security group
Common security groups: select mySG
Configuration setting: Default
Advance details: go to User data and write your script
#!/bin/bash
sudo su -
#Install Apache Web Server and PHP
yum install -y httpd
echo"My test Page"> /var/www/html/index.html
#Turn on web server
systemctl enable httpd
systemctl start httpd
click on Launch Instance.
When instance is in running state copy public IP and paste it on new browser tab. Congratulation you have configured your VPC and run a websever.
For Video demo click https://youtu.be/REY6XMHq5mI?si=nMoq6APYfQt9Idff
Thank you, Happy Learning!!
